 flask基础(2)
# day03
# 内容回顾
# 1. 面向对象:特殊方法
   obj['x'] = 123
   obj.x = 123
   obj + 123
# 2. functools
   def func(a1,a2,a3):
      return a1 + a2 + a3

   v1 = func(1,2,3)

   new_func = functools.partial(func,111,2)  # partial帮助我们传递参数原来func需要传递三个参数,现在只用传递一个 a3=3
   new_func(3)
2
3
4
5
6
7
8
9
10
11
12
# 今日内容
# 1、上下文管理
我看的这个:<https://www.cnblogs.com/zhaopanpan/articles/9457343.html>
<https://cloud.tencent.com/developer/article/1794125>
2
django、tornado是通过传参的形式传递数据,而flask是通过其特有的上下文管理机制来管理数据的。
在flask中,上下文管理机制分为两个大的部分:请求上下文和应用上下文。
在了解flask上下文管理机制之前,先来一波必知必会的知识点
# 1.1 __call__
创建对象的
这个方法相信大家并不陌生,在单例模式中,我们可能用到过,除此之外,还想就没有在什么特殊场景中用到了。我们往往忽视了它一个很特殊的用法:对象object+()或者类Foo()+()这种很特殊的用法。在Flask上下文管理中,入口就是使用了这种方式。
# 1.2 __getitem__
使用这个系列的方法时,我们最大的印象就是调用对象的属性可以像字典取值一样使用中括号[]。使用中括号对对象中的属性进行取值、赋值或者删除时,会自动触发对应的getitem、setitem、delitem方法。
class Foo(object):

    def __init__(self):
        self.name = "boo"

    def __getitem__(self, item):
        print("调用__getitem__了", item)
        if item in self.__dict__:
            return self.__dict__[item]

    def __setitem__(self, key, value):
        print("调用__setitem__方法了", key, value)
        self.__dict__[key] = value

    def __delitem__(self, key):
        print("调用__delitem__", key)
        del self.__dict__[key]

foo = Foo()
ret = foo["name"]
# print(ret)     # 输出     调用__getitem__了      boo
foo["age"] = 18
# print(foo["age"])   # 输出   调用__setitem__方法了   调用__getitem__了    18
del foo["age"]  # 输出  调用__delitem__

"""
在类中实现了 __getitem__ 方法可以使用对象[属性] 拿到对应的值,
在类中实现了 __setitem__ 方法可以直接对象[属性] 添加值
在类中实现了 __delitem__ 方法  foo["age"]
"""
2
3
4
5
6
7
8
9
10
11
12
13
14
15
16
17
18
19
20
21
22
23
24
25
26
27
28
29
30
# 1.3 __getattr__
使用对象取值、赋值或者删除时,会默认的调用对应的getattr、setattr、delattr方法。
对象取值时,取值的顺序为:先从getattribute中找,第二步从对象的属性中找,第三步从当前类中找,第四步从父类中找,第五步从getattr中找,如果没有,直接抛出异常。
class Foo(object):

    def __init__(self):
        self.name = "boo"

    def __getattr__(self, item):
        print("调用__getattr__了", item)

    def __setattr__(self, key, value):
        print("调用__setattr__方法了", key, value)

    def __delattr__(self, item):
        print("调用__delattr__", item)

foo = Foo()
ret = foo.xxx  # 输出     调用__getattr__了
foo.age = 18  # 调用__setattr__方法了
del foo.age  # 输出  调用__delattr__
"""
调用__setattr__方法了 name boo
调用__getattr__了 xxx
调用__setattr__方法了 age 18
调用__delattr__ age
"""
2
3
4
5
6
7
8
9
10
11
12
13
14
15
16
17
18
19
20
21
22
23
24
# 1.4 偏函数
python中有一个小工具包functools,这个包中包含了几个在很有用的小功能,比如:
- wraps:在使用装饰器时,使用这个方法可以保护函数的元信息。
- reduce:一个合并序列项为一个单一值的小方法。
- 还有一个就是偏函数: partial
一句话来总结partial的作用,固定函数中的一些参数,返回一个新的函数,方便调用
from functools import partial

class Foo(object):

    def __init__(self):
        self.request = "request"
        self.session = "session"

foo = Foo()

def func(args):
    return getattr(foo, args)

re_func = partial(func, 'request')  # 帮助源函数传递值
se_func = partial(func, 'session')

print(re_func())
print(se_func())
2
3
4
5
6
7
8
9
10
11
12
13
14
15
16
17
18
# 1.5 threading Local()
详细资料:<http://c.biancheng.net/view/2628.html>
在多线程中,同一个进程中的多个线程是共享一个内存地址的,多个线程操作数据时,就会造成数据的不安全,所以我们就要加锁。但是,对于一些变量,如果仅仅只在本线程中使用,怎么办?
方法一,可以通过全局的字典,key为当前线程的线程ID,value为具体的值。(自定义方法)
方法二,使用threading.local方法
作用:为每一个线程开辟一块空间进行数据存储,空间和空间是互相隔离的
# a. 使用local方法
import time
import threading

local = threading.local()

def func(n):
    local.val = n
    time.sleep(5)
    print(n)

for i in range(10):
    t = threading.Thread(target=func,args=(i,))
    t.start()

# 结果输出    0--9
2
3
4
5
6
7
8
9
10
11
12
13
14
15
# b.!自定义实现Local(),重点看一下
定制粒度更细的
try:
    from greenlet import getcurrent as get_ident
except Exception as e:
    from threading import get_ident
from threading import Thread
import time

class Local(object):

    def __init__(self):
        # self.storage = {}
        # 为什么不能直接这样,因为当进来Local对象中的self.storage是调用内部的__setattr__方法创建的,但是这里被我们重写了,所以不会去创建实例变量
        # 我们就要去调用父类的__setattr__方法进行创建
        object.__setattr__(self, 'storage', {})  # self.storage = object.__setattr__(self, 'storage', {})

    def __setattr__(self, k, v):
        ident = get_ident()  # 得到线程或者协程的id
        if ident in self.storage:
            self.storage[ident][k] = v
        else:
            self.storage[ident] = {k: v}

    def __getattr__(self, k):
        ident = get_ident()
        return self.storage[ident][k]

obj = Local()

def task(arg):
    obj.val = arg  # 在类中实现了__setattr__(k,v) 就可以通过 对象.key =值 直接存
    # print(obj.storage)
    # obj.xxx = arg
    time.sleep(2)
    print(obj.val)  # 在类中实现了__getattr__(k,) 就可以通过 对象.key 直接获取字典的值

for i in range(10):
    t = Thread(target=task, args=(i,))
    t.start()

"""
1.可以通过协程的方式或者线程的方式创建
{24244: {'val': 0}}
{24244: {'val': 0}, 19356: {'val': 1}}
"""
2
3
4
5
6
7
8
9
10
11
12
13
14
15
16
17
18
19
20
21
22
23
24
25
26
27
28
29
30
31
32
33
34
35
36
37
38
39
40
41
42
43
44
# c. 仿照flask用栈来实现自定义threading.local的存取
from greenlet import getcurrent

class Local(object):

    def __init__(self):
        object.__setattr__(self, "_storage", {})

    def __setattr__(self, key, value):

        # ident = threading.get_ident()
        ident = getcurrent()  # 得到协程的id 定制粒度更细的
        if ident in self._storage:
            self._storage[ident][key] = value
        else:
            self._storage[ident] = {key: value}

    def __getattr__(self, item):
        # ident = threading.get_ident()
        ident = getcurrent()
        return self._storage[ident][item]

class LocalStack(object):

    def __init__(self):
        self.local = Local()

    def push(self, item):
        self.local.stack = []
        self.local.stack.append(item)

    def pop(self):
        return self.local.stack.pop()

    def top(self):
        return self.local.stack[-1]

_local_stack = LocalStack()
_local_stack.push(55)
_local_stack.push(32)
_local_stack.push(21)
print(_local_stack.top())  # 取栈顶元素
2
3
4
5
6
7
8
9
10
11
12
13
14
15
16
17
18
19
20
21
22
23
24
25
26
27
28
29
30
31
32
33
34
35
36
37
38
39
40
41
# 1.6 flask的上下文管理机制
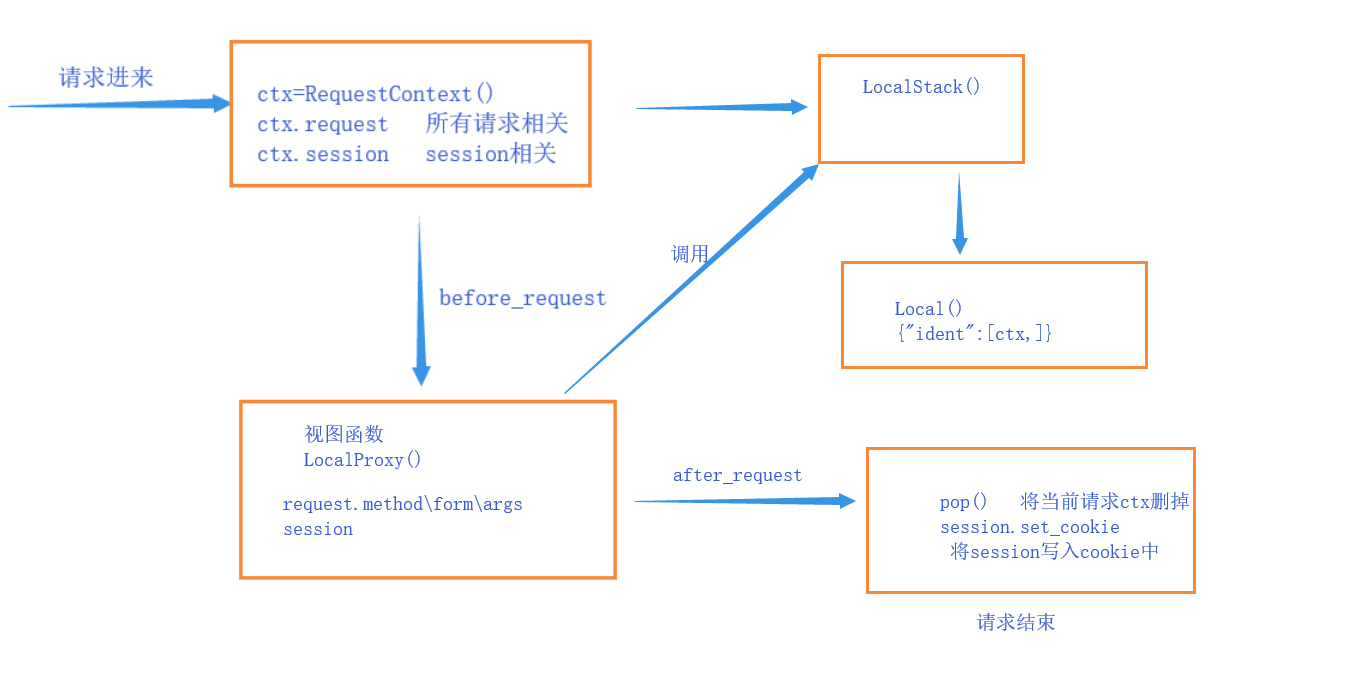
在flask中,上下文管理机制分为两个大的部分:请求上下文和应用上下文。
- 请求上下文:request/session
- 应用上下文:app/g
从以下三个大的方面分别探讨flask的两大上下文管理机制。
- 方面一:请求进来时
- 方面二:视图函数
- 方面三:请求结束前
# 1. 请求上下文管理
先来一个最简单的flask版的Hello World
from flask import Flask

app = Flask(__name__)

@app.route('/')
def index():
    return "Hello World"

if __name__ == '__main__':
    app.run()
2
3
4
5
6
7
8
9
10
启动一个flask项目时,会先执行app.run()方法,这是整个项目的入口,执行run方法时,接着执行werkzeug模块中的run_simple

werkzeug中触发调用了Flask的call方法
# a. 请求进来时
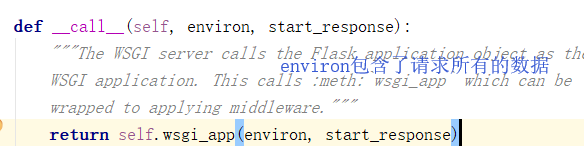
触发执行call方法,call方法的逻辑很简单,直接执行wsgi_app方法,将包含所有请求相关数据和一个响应函数传进去。
def application(environ, start_response):
    start_response('200 OK', [('Content-Type', 'text/html')])
    return '<h1>Hello, web!</h1>'

上面的application()函数就是符合WSGI标准的一个HTTP处理函数,它接收两个参数:

    environ:一个包含所有HTTP请求信息的dict对象;

    start_response:一个发送HTTP响应的函数。

在application()函数中,调用:

start_response('200 OK', [('Content-Type', 'text/html')])
2
3
4
5
6
7
8
9
10
11
12
13
备注:call是一个符合wsgi标准的函数
执行wsgi_app方法
def wsgi_app(self, environ, start_response):

        ctx = self.request_context(environ)
        error = None
        try:
            try:
                ctx.push()
                response = self.full_dispatch_request()
            except Exception as e:
                error = e
                response = self.handle_exception(e)
            except:
                error = sys.exc_info()[1]
                raise
            return response(environ, start_response)
        finally:
            if self.should_ignore_error(error):
                error = None
            ctx.auto_pop(error)
2
3
4
5
6
7
8
9
10
11
12
13
14
15
16
17
18
19
第一步先执行了一个request_context的方法,将environ传进去,最后返回一个RequestContext类的对象,被ctx的变量接收(ctx=request_context(environ))
 def request_context(self, environ):
        """Create a :class:`~flask.ctx.RequestContext` representing a
        WSGI environment. Use a ``with`` block to push the context,
        which will make :data:`request` point at this request.

        See :doc:`/reqcontext`.

        Typically you should not call this from your own code. A request
        context is automatically pushed by the :meth:`wsgi_app` when
        handling a request. Use :meth:`test_request_context` to create
        an environment and context instead of this method.

        :param environ: a WSGI environment
        """
        return RequestContext(self, environ)
2
3
4
5
6
7
8
9
10
11
12
13
14
15
这个ctx对象在初始化时,赋了两个非常有用的属性,一个是request,一个是session
def __init__(self, app, environ, request=None):
    self.app = app
    if request is None:
        request = app.request_class(environ)
    self.request = request
    self.url_adapter = app.create_url_adapter(self.request)
    self.flashes = None
    self.session = None
2
3
4
5
6
7
8
这两个属性中request是一个Request()对象,这个对象就是我们在flask中使用的request对象,为我们提供了很多便捷的属性和方法,比如:request.method、request.form、request.args等等,另一个属性是session,初始为None。
紧接着执行ctx.push()方法,这个方法中,在执行请求上下文对象ctx之前先实例化了一个app_context对象,先执行了app_context的push方法,然后才执行request_ctx_stack对象中的top和request_ctx_stack.push(self),最后对ctx中的session进行处理。
所以,flask中的应用上下文发生在请求上下文之前。
def push(self):

        top = _request_ctx_stack.top
        if top is not None and top.preserved:
            top.pop(top._preserved_exc)

        # 在执行request_context请求上下文的push方法时,先执行了app_context应用上下文的push方法
        app_ctx = _app_ctx_stack.top
        if app_ctx is None or app_ctx.app != self.app:
            app_ctx = self.app.app_context()
            app_ctx.push()
            self._implicit_app_ctx_stack.append(app_ctx)
        else:
            self._implicit_app_ctx_stack.append(None)

        if hasattr(sys, 'exc_clear'):
            sys.exc_clear()

        # 然后执行请求上下文对象中LocalStack对象的push方法
        _request_ctx_stack.push(self)

        # 最后处理session
        if self.session is None:
            session_interface = self.app.session_interface
            self.session = session_interface.open_session(
                self.app, self.request
            )

            if self.session is None:
                self.session = session_interface.make_null_session(self.app)
2
3
4
5
6
7
8
9
10
11
12
13
14
15
16
17
18
19
20
21
22
23
24
25
26
27
28
29
30
但是我们先说请求上下文,在处理完应用上下文的push方法后,紧接着执行了_request_ctx_stack对象的两个方法。
而这个*request_ctx_stack是LocalStack这个类的对象。*request_ctx_stack = LocalStack()
LocalStack有没有很眼熟,没错,flask内部使用的机制就是类似于我们上文中自定义的LocalStack的机制,实例化过程中使用了面向对象中的组合概念,self._local = Local(),然后在自身又实现了push、pop、top方法,这三个方法中都是通过反射从Local类的实例化对象中对一个stack属性进行append、pop、[-1]的操作,所以,Local对象中的stack属性对应的值一定是一个类似于列表的东西。通过对列表的操作,实现一个类似于栈的存取。
接着聊聊这个Local类,在实例化时,会对每个对象生成一个storage的空字典。我们翻遍整个Local类的源码,发现内部并没有实现一个叫stack的方法或者属性,但是上面我们提到了LocalStack对象会对Local对象中的一个叫stack的东西进行一系列操作。找不到不会报错吗?
这就是flask的巧妙之处,通过类的一些魔法方法巧妙的实现了相应的处理。在前引中,提到如果对象中没有某个属性,取值时,最终会执行类中的getattr方法,然后再做后续的异常处理,flask将所有的对应逻辑都实现在了类的getattr方法中,将每一个线程存储到字典中,在请求进来时,将每一个对应的请求ctx存在一个列表中,使用时直接调用,而不是通过传参的形式,更体现出了flask框架的轻量级。
处理完_request_ctx_stack后,就该处理session了。
在flask中,处理session时,非常的巧妙,完美的遵循了开闭原则,会先执行session_interface对象的open_session方法,在这个方法中,会先从用户请求的cookie中获取sessionid,获取该用户之前设置的session值,然后将值赋值到ctx.session中。
处理完session后,ctx.push方法就执行完了,返回到最开始的app.wsgi_app方法中,执行完push方法后,接着执行full_dispatch_request方法,从这个名字中我们也能猜到,这个方法只要是负责请求的分发。
def full_dispatch_request(self):

            self.try_trigger_before_first_request_functions()
            try:
                request_started.send(self)
                rv = self.preprocess_request()
                if rv is None:
                    rv = self.dispatch_request()
            except Exception as e:
                rv = self.handle_user_exception(e)
            return self.finalize_request(rv)
2
3
4
5
6
7
8
9
10
11
在full_dispatch_request方法中先执行preprocess_request方法,这个方法,会先执行所有被before_request装饰器装饰的函数,然后就通过路由的分发执行视图函数了(dispatch_request)
# b. 执行视图函数时
在执行视图函数之前,先执行了before_request,在执行我们的视图函数。
视图函数主要处理业务逻辑。在视图函数中可以调用request对象,进行取值,也可以调用session对象对session的存取。
在整个request的请求生命周期中,获取请求的数据直接调用request即可,对session进行操作直接调用session即可。request和session都是LocalProxy对象,借助偏函数的概念将对应的值传入lookup_req_object函数。先从request_ctx_stack(LocalStack)对象中获取ctx(请求上下文对象),再通过反射分别获取request和session属性。整个过程中LocalStack扮演了一个全局仓库的角色,请求进来将数据存取,需要时即去即用。所以,flask实现了在整个请求的生命周期中哪儿需要就直接调用的特色。
request = LocalProxy(partial(_lookup_req_object, 'request'))
session = LocalProxy(partial(_lookup_req_object, 'session'))
2
# c. 请求结束前
视图函数执行完后,dispatch_request执行结束,执行full_dispatch_request方法的返回值finalize_request方法。这个方法中,同样的,在返回响应之前,先执行所有被after_request装饰器装饰的函数。
---->finalize_request ------> process_response
 def process_response(self, response):

        ctx = _request_ctx_stack.top
        bp = ctx.request.blueprint
        funcs = ctx._after_request_functions
        if bp is not None and bp in self.after_request_funcs:
            funcs = chain(funcs, reversed(self.after_request_funcs[bp]))
        if None in self.after_request_funcs:
            funcs = chain(funcs, reversed(self.after_request_funcs[None]))
        for handler in funcs:
            response = handler(response)
        if not self.session_interface.is_null_session(ctx.session):
            self.session_interface.save_session(self, ctx.session, response)
        return response
2
3
4
5
6
7
8
9
10
11
12
13
14
15
执行process_response过程中,执行完after_request后,然后,执行session的save_session方法。将内存中保存在ctx.session的值取到后,json.dumps()序列化后,写入响应的cookie中(set_cookie),最后返回响应。
    def save_session(self, app, session, response):
        domain = self.get_cookie_domain(app)
        path = self.get_cookie_path(app)

        # If the session is modified to be empty, remove the cookie.
        # If the session is empty, return without setting the cookie.
        if not session:
            if session.modified:
                response.delete_cookie(
                    app.session_cookie_name,
                    domain=domain,
                    path=path
                )

            return

        # Add a "Vary: Cookie" header if the session was accessed at all.
        if session.accessed:
            response.vary.add('Cookie')

        if not self.should_set_cookie(app, session):
            return

        httponly = self.get_cookie_httponly(app)
        secure = self.get_cookie_secure(app)
        samesite = self.get_cookie_samesite(app)
        expires = self.get_expiration_time(app, session)
        val = self.get_signing_serializer(app).dumps(dict(session))
        # set_cookie将session写入响应的cookie中
        response.set_cookie(
            app.session_cookie_name,
            val,
            expires=expires,
            httponly=httponly,
            domain=domain,
            path=path,
            secure=secure,
            samesite=samesite
        )
2
3
4
5
6
7
8
9
10
11
12
13
14
15
16
17
18
19
20
21
22
23
24
25
26
27
28
29
30
31
32
33
34
35
36
37
38
39
返回响应后,自动的调用ctx.auto_pop(error),将Local中存储的ctx对象pop掉,整个请求结束。
请求上下文的执行流程:
# 2 应用上下文
与请求上下文类似,当请求进来时,先实例化一个AppContext对象app_ctx,在实例化的过程中,提供了两个有用的属性,一个是app,一个是g。self.app就是传入的全局的app对象,self.g是一个全局的存储值的对象。接着将这个app_ctx存放到LocalStack()。
class AppContext(object):
	def __init__(self, app):
		self.app = app
		self.url_adapter = app.create_url_adapter(None)
		self.g = app.app_ctx_globals_class()
2
3
4
5
视图函数中,我们就可以调用app对象和g对象,如果我们使用蓝图构建我们的项目时,在每一个直接引用app就会造成循环引用的异常,这时,应用上下文就会显得非常有用,我们可以直接调用current_app就可以在整个生命周期中使用我们的app对象了。比如使用我们的配置项:current_app.config
current_app = LocalProxy(_find_app)
最后,当视图函数执行结束后,从storage中pop掉app_ctx对象。
from flask import Flask,request,session,g

app = Flask(__name__)  # type:Flask

@app.before_request
def auth_demo():
    g.val = 123

@app.route('/')
def index():
    print(g.val)
    return "Hello World"

if __name__ == '__main__':
    app.run()
2
3
4
5
6
7
8
9
10
11
12
13
14
15
总结:flask中的上下文管理机制分为请求上下文和应用上下文两大方面,通过上下文的管理机制,实现了即去即用的一个特色。
# a.应用g
from flask import Flask, g, request

app = Flask(__name__)

@app.before_request
def bf():
    g.x = 666

@app.route('/n1')
def n1():
    print(g.x)  # 这样就可以共享全局的值了,都可以存在g中
    return 'n1'

@app.route('/n2')
def n2():
    print(g.x)
    return 'n2'

if __name__ == '__main__':
    app.run()
2
3
4
5
6
7
8
9
10
11
12
13
14
15
16
17
18
19
20
# day04
# 内容回顾
# 今日内容
# 1、flask_session
详细:<https://blog.csdn.net/weixin_43976393/article/details/87983656?spm=1001.2101.3001.6661.1&utm_medium=distribute.pc_relevant_t0.none-task-blog-2%7Edefault%7EBlogCommendFromBaidu%7ERate-1-87983656-blog-83781020.pc_relevant_antiscanv2&depth_1-utm_source=distribute.pc_relevant_t0.none-task-blog-2%7Edefault%7EBlogCommendFromBaidu%7ERate-1-87983656-blog-83781020.pc_relevant_antiscanv2&utm_relevant_index=1>
作用:将默认保存的签名cookie中的值,保存到redis/memcached/file/mangodb/SQLAlchemy中
注意:session中存储的是字典,修改字典内部元素时,会造成数据不更新,解决方法:
- motified = True
- SESSION_REFRESH_EACH_REQUEST = True and session.permanent = True(redis中默认)
存入session的方式,将session存入数据库中,不使用默认的了
"""
1. flask-session
    作用:将默认保存的签名cookie中的值 保存到 redis/memcached/file/Mongodb/SQLAlchemy
"""
from flask import Flask, request, session

app = Flask(__name__)
app.secret_key = 'abasd'

# 默认的session存储方式
from flask.sessions import SecureCookieSessionInterface
app.session_interface = SecureCookieSessionInterface()

# 其他
# 方式一:保存到redis中
from redis import Redis
from flask_session import RedisSessionInterface

app.session_interface = RedisSessionInterface(
    redis=Redis(host='127.0.0.1', port=6379),
    key_prefix='rediszz'  # session的前缀
)
# 方式二 保存在redis中
from flask_session import Session
from redis import Redis

app.config['SESSION_TYPE'] = 'REDIS'
app.config['SESSION_REDIS'] = Redis(host='', db='', port='', password='', encoding='')
Session(app)

@app.route('/login', methods=['GET', 'POST'])
def login():
    if request.method == 'GET':
        return 'login'
    user = request.form.get('user')
    pwd = request.form.get('pwd')
    session['user_info'] = {'user': user, 'pwd': pwd}
    return 'login'

@app.route('/index', methods=['GET'])
def index():
    user_info = session.get('user_info')
    return 'index'

if __name__ == '__main__':
    app.run()
2
3
4
5
6
7
8
9
10
11
12
13
14
15
16
17
18
19
20
21
22
23
24
25
26
27
28
29
30
31
32
33
34
35
36
37
38
39
40
41
42
43
44
45
46
# 2、数据库连接池
pip install DBUtils

模式:
  - 每个线程创建一个连接,关闭(默认不关闭),线程终止时,才关闭连接。
  - 创建共享连接池
应用:只要写原生SQL,用户数据框连接池
2
3
4
5
6
# 3、wtforms
基本使用:<http://www.cnblogs.com/wupeiqi/articles/8202357.html>

作用:用于对python web框架做表单验证。

	使用:
		class MyForm(Form):
			user = 类(正则,插件)
			字段 = 类(正则,插件)
			字段 = 类(正则,插件)
			字段 = 类(正则,插件)
			字段 = 类(正则,插件)
			字段 = 类(正则,插件)

		form = MyForm()
		# 生成HTML标签
		print(form.user) 类.__str__ ==> 插件.xx方法

		# 验证
		form = MyForm(formdata=request.form)
		if form.validate():
			# 内部找到所有的字段:user + 用户发过来的数据 =》 正则校验
2
3
4
5
6
7
8
9
10
11
12
13
14
15
16
17
18
19
20
21
# day05
# 内容回顾
# 今日内容
# 1、面向对象相关
# 1.1 __mro__
得到类继承的执行顺序
class A(object):
    pass

class B(A):
    pass

class C(object):
    pass

class D(B, C):
    pass

print(D.__mro__)
# 得到类继承的执行顺序
# (<class '__main__.D'>, <class '__main__.B'>, <class '__main__.A'>, <class '__main__.C'>, <class 'object'>)
2
3
4
5
6
7
8
9
10
11
12
13
14
15
# 1.2 __dict__
以字典的形式查看对象或者字典的属性
class Foo(object):
    CITY = 'bj'

    def __init__(self, name, age):
        self.name = name
        self.age = age

    def func(self):
        pass

# print(Foo.CITY)
# print(Foo.func)

# 类的__ dict __ 属性
print(Foo.__dict__)

# 类对象 的__ dict __ 属性
obj1 = Foo('小明', 54)
print(obj1.__dict__)

# __ dict __  查看对象其属性
2
3
4
5
6
7
8
9
10
11
12
13
14
15
16
17
18
19
20
21
# 1.3 metaclass
# 1. 创建类的二种方式
# 方式一:
class Foo(object):
    CITY = "bj"

    def func(self, x):
        return x + 1
foo = Foo()
print(foo.func(10))

# 方式二:
Foo2 = type('Foo2', (object,), {'CITY': 'bj1', 'func': lambda self, x: x + 1})
foo2 = Foo2
print(foo2.CITY)
2
3
4
5
6
7
8
9
10
11
12
13
# 2.创建自定义的type类
因为类都是继承type去创建的,我们可以继承type,在其前后执行一些操作
	1. 默认类由type实例化创建。
    2. 某个类指定metaclass=MyType,那么当前类的所有派生类都由于MyType创建。
    3. 实例化对象对象顺序
      - type.__init__
      - type.__call__
      - 类.__new__
      - 类.__init__
class MyType(type):
    def __init__(self,*args,**kwargs):
        print('创建类之前')
        super(MyType,self).__init__(*args,**kwargs)  # 创建FOO类
        print('创建类之后')

class Foo(object,metaclass=MyType): # 当前类,由type类创建。
    CITY = "bj"
    def func(self, x):
        return x + 1
# ############# 创建类 ###########
# 1. 创建类的两种方式
"""
class Foo(object,metaclass=type):
    CITY = "bj"

    def func(self,x):
        return x + 1

Foo = type('Foo',(object,),{'CITY':'bj','func':lambda self,x:x+1})
"""

# 2. 类由自定义type创建
#    类由type创建,通过metaclass可以指定当前类由那一个type创建。
"""
class MyType(type):
    def __init__(self,*args,**kwargs):
        print('创建类之前')
        super(MyType,self).__init__(*args,**kwargs)
        print('创建类之后')

class Foo(object,metaclass=MyType): # 当前类,由type类创建。
    CITY = "bj"
    def func(self, x):
        return x + 1
"""
# 3. 类的继承
#    类的基类中指定了metaclass,那么当前类也是由metaclass指定的类来创建当前类。
"""
class MyType(type):
    def __init__(self,*args,**kwargs):
        print('创建类之前')
        super(MyType,self).__init__(*args,**kwargs)
        print('创建类之后')

class Foo(object,metaclass=MyType): # 当前类,由type类创建。
    CITY = "bj"
    def func(self, x):
        return x + 1

class Bar(Foo):
    pass
"""

# ################### 变 ##################
"""
class MyType(type):
    def __init__(self,*args,**kwargs):
        print('创建类之前')
        super(MyType,self).__init__(*args,**kwargs)
        print('创建类之后')

Base = MyType('Base',(object,),{})
# class Base(object,metaclass=MyType):
#     pass

class Foo(Base):
    CITY = "bj"
    def func(self, x):
        return x + 1
"""
# ################ 变 #################
"""
class MyType(type):
    def __init__(self,*args,**kwargs):
        print('创建类之前')
        super(MyType,self).__init__(*args,**kwargs)
        print('创建类之后')

def with_metaclass(arg):
    return MyType('Base',(arg,),{}) # class Base(object,metaclass=MyType): pass

class Foo(with_metaclass(object)):
    CITY = "bj"
    def func(self, x):
        return x + 1
"""

# ########################## 实例化 ######################
class MyType(type):
    def __init__(self, *args, **kwargs):
        super(MyType, self).__init__(*args, **kwargs)

class Foo(object, metaclass=MyType):  # 当前类,由type类创建。
    pass

"""
内部执行顺序
0. Mytype的__init__
obj = Foo()
1. MyType的__call__
2. Foo的__new__
3. Foo的__init__
"""
2
3
4
5
6
7
8
9
10
11
12
13
14
15
16
17
18
19
20
21
22
23
24
25
26
27
28
29
30
31
32
33
34
35
36
37
38
39
40
41
42
43
44
45
46
47
48
49
50
51
52
53
54
55
56
57
58
59
60
61
62
63
64
65
66
67
68
69
70
71
72
73
74
75
76
77
78
79
80
81
82
83
84
85
86
87
88
89
90
91
92
93
94
95
96
97
98
99
100
101
102
103
104
105
106
107
108
109
110
111
# dayo6
# 内容回顾
# 今日内容
# 1、flask_script
- python manage.py (opens new window) runserver
- python manage.py (opens new window) 自定义命令
自定义脚本命令
a. pip install flask_script
b.manager = Manager(app) # 传递app
c. manager.run() # 改了就可以使用 python manage.py (opens new window) runserver运行
d.自定义命令脚本
from flask_migrate import Migrate

from s8day130_pro import create_app,db
from flask_script import Manager

app = create_app()
manager = Manager(app)  # 传递app

@manager.command
def custom(arg):  # 自定义脚本命令
    """
    自定义命令
    python manage.py custom 123
    :param arg:
    :return:
    """
    print(arg)

@manager.option('-n', '--name', dest='name')
@manager.option('-u', '--url', dest='url')
def cmd(name, url):
    """
    自定义命令
    执行: python manage.py  cmd -n wupeiqi -u <http://www.oldboyedu.com>
    执行: python manage.py  cmd --name wupeiqi --url <http://www.oldboyedu.com>
    :param name:
    :param url:
    :return:
    """
    print(name, url)

if __name__ == '__main__':
    # app.run()
    manager.run()  # 改了就可以使用 python manage.py runserver运行
2
3
4
5
6
7
8
9
10
11
12
13
14
15
16
17
18
19
20
21
22
23
24
25
26
27
28
29
30
31
32
33
34
# 2、flask-sqlalchemy
作用:将SQLAlchemy相关的所有功能都封装到db=flask_sqlalchemy.SQLAlchemy()对象中
    - 创建表
        class User(db.Model):
        pass

    - 操作表
        db.session

   扩展:离线脚本编写
      from s8day130_pro import db
      from s8day130_pro import create_app
      from s8day130_pro import models

      app = create_app()
      with app.app_context():
         # db.drop_all()
         # db.create_all()
         data = db.session.query(models.Users).all()
         print(data)
   步骤:
      1. 在 __init__.py中创建db对象
         from flask_sqlalchemy import SQLAlchemy

         # 包含了SQLAlchemy相关的所有操作
         db = SQLAlchemy()

      2. 在 __init__.py中create_app函数中让将app传入到db中

         def create_app():
            app = Flask(__name__)
            app.config.from_object('settings.DevelopmentConfig')

            from .views.account import ac
            app.register_blueprint(ac)

            # 看这里看这里
            db.init_app(app)

            return app

      3. 写配置文件,将连接字符串定义在配置文件中
             SQLALCHEMY_DATABASE_URI = "mysql+pymysql://root:123456@127.0.0.1:3306/s8day130db?charset=utf8"
            SQLALCHEMY_POOL_SIZE = 5
            SQLALCHEMY_POOL_TIMEOUT = 30
            SQLALCHEMY_POOL_RECYCLE = -1

      4. 定义 s8day130_pro/models.py

            #!/usr/bin/env python
            # -*- coding:utf-8 -*-
            from sqlalchemy.ext.declarative import declarative_base
            from sqlalchemy import Column, Integer, String, UniqueConstraint, Index,DateTime,ForeignKey
            from s8day130_pro import db

            class Users(db.Model):
               __tablename__ = 'users'
               id = Column(Integer, primary_key=True,autoincrement=True)
               name = Column(String(32),nullable=False,unique=True)

      5. 创建数据库表,编写离线脚本:drop_create_table.py
            from s8day130_pro import db
            from s8day130_pro import create_app
            from s8day130_pro import models

            app = create_app()
            with app.app_context():
               db.drop_all()
               db.create_all()
               #data = db.session.query(models.Users).all()
               #print(data)

      6. 在视图函数中使用SQLAlchemy操作数据库
            from s8day130_pro import models
            from s8day130_pro import db
            ac = blueprints.Blueprint('ac',__name__)

            @ac.route('/login',methods=['GET','POST'])
            def login():
               data = db.session.query(models.Users).all()
               print(data)
               db.session.remove()
               return 'Login'
2
3
4
5
6
7
8
9
10
11
12
13
14
15
16
17
18
19
20
21
22
23
24
25
26
27
28
29
30
31
32
33
34
35
36
37
38
39
40
41
42
43
44
45
46
47
48
49
50
51
52
53
54
55
56
57
58
59
60
61
62
63
64
65
66
67
68
69
70
71
72
73
74
75
76
77
78
79
80
81
82
# 3、 SQLAlchemy两种创建session的方式
	方式一:
         import models
         from threading import Thread
         from sqlalchemy.orm import sessionmaker
         from sqlalchemy import create_engine

         engine =create_engine("mysql+pymysql://root:123456@127.0.0.1:3306/s8day128db?charset=utf8",pool_size=2,max_overflow=0)
         XXXXXX = sessionmaker(bind=engine)

         def task():
            from sqlalchemy.orm.session import Session
            session = XXXXXX()

            data = session.query(models.Classes).all()
            print(data)

            session.close()

         for i in range(10):
            t = Thread(target=task)
            t.start()

      方式二(推荐):
         import models
         from threading import Thread
         from sqlalchemy.orm import sessionmaker
         from sqlalchemy import create_engine
         from sqlalchemy.orm import scoped_session

         engine =create_engine("mysql+pymysql://root:123456@127.0.0.1:3306/s8day128db?charset=utf8",pool_size=2,max_overflow=0)
         XXXXXX = sessionmaker(bind=engine)

         session = scoped_session(XXXXXX)

         def task():
            # 1. 原来的session对象 = 执行session.registry()
            # 2. 原来session对象.query
            data = session.query(models.Classes).all()
            print(data)
            session.remove()

         for i in range(10):
            t = Thread(target=task)
            t.start()

   flask-session默认也是使用的第二种方式:scoped_session
2
3
4
5
6
7
8
9
10
11
12
13
14
15
16
17
18
19
20
21
22
23
24
25
26
27
28
29
30
31
32
33
34
35
36
37
38
39
40
41
42
43
44
45
46
# 4、flask-migrate
帮助我们像django一样可以生成,迁移数据库
	作用:做数据库迁移
    依赖:
      flask-script
      flask-sqlalchemy

   Migrate(app, db)
   """
   # 数据库迁移命名
      python manage.py db init
      python manage.py db migrate # makemigrations
      python manage.py db upgrade # migrate
   """
   manager.add_command('db', MigrateCommand)
2
3
4
5
6
7
8
9
10
11
12
13
# 5、多app应用(url进行处理和分发)
多个app一起启动通过前面加app名称去访问对应的app
- 多app应用(url进行处理和分发)
   from flask import Flask
   from werkzeug.wsgi import DispatcherMiddleware
   from werkzeug.serving import run_simple

   app01 = Flask('app01')
   app02 = Flask('app02')

   @app01.route('/login')
   def login():
      return 'app01.login'

   @app02.route('/index')
   def index():
      return 'app02.index'

   dm = DispatcherMiddleware(app01,{
      '/app02':        app02,
   })

   if __name__ == '__main__':
      run_simple('localhost', 5000,dm)
2
3
4
5
6
7
8
9
10
11
12
13
14
15
16
17
18
19
20
21
22
# 6、信号:blinker
请求前,后,中执行信号
更多详细:<https://www.cnblogs.com/wupeiqi/articles/8249576.html>
使用方式:<https://www.cnblogs.com/WiseAdministrator/articles/11217681.html>
- 信号:blinker

   appcontext_pushed = _signals.signal('appcontext-pushed')
   request_started = _signals.signal('request-started')

   如果有render:
      before_render_template = _signals.signal('before-render-template')
      template_rendered = _signals.signal('template-rendered')

   request_finished = _signals.signal('request-finished')

   如果视图函数有异常:
      got_request_exception = _signals.signal('got-request-exception')

   request_tearing_down = _signals.signal('request-tearing-down')
   appcontext_tearing_down = _signals.signal('appcontext-tearing-down')

   appcontext_popped = _signals.signal('appcontext-popped')

   如果使用信号:
      message_flashed = _signals.signal('message-flashed')

   使用:
      from flask import Flask,signals,render_template,flash

      app = Flask(__name__)

      def func1(*args,**kwargs):
         print('触发信号:request_started')

      def func2(*args,**kwargs):
         print('触发信号:appcontext_pushed')

      signals.request_started.connect(func1)
      signals.appcontext_pushed.connect(func2)

      @app.route('/login')
      def login():
         return render_template('index.html')

      if __name__ == '__main__':
         app.run()

   问题:信号和before_request区别?

        before_request,可以控制请求是否可以继续往后执行。
        信号,在原来的基础增加额外的操作和值。
2
3
4
5
6
7
8
9
10
11
12
13
14
15
16
17
18
19
20
21
22
23
24
25
26
27
28
29
30
31
32
33
34
35
36
37
38
39
40
41
42
43
44
45
46
47
48
49
1