 自定义响应格式
# 1. 自定义响应格式介绍
之前我们讲了自定义异常,主要目的是为了方便移动端开发使用的,但是我们在给移动端提供正常的响应格式的时候,也要像自定义异常一样,具有一定的格式。目前我们返回的数据格式是这样的:
{
    "next": "http://127.0.0.1:8000/api/v1/games/?cursor=cD0x",
    "previous": null,
    "results": [
        {
            "id": 1,
            "name": "帅高高",
            "status": 0
        }
    ]
}
2
3
4
5
6
7
8
9
10
11
或者:
{
    "id": 1,
    "name": "帅高高",
    "status": 0
}
2
3
4
5
还是那句话,返回这样格式的数据,对于移动端是不友好的,所以我们需要自定义返回消息,返回的结构如下 :
{
    "code": 200,
    "message": "success",
    "data": [
        {
            "id": 1,
            "name": "帅高高",
            "status": 0
        }
    ],
    "next": "http://127.0.0.1:8000/api/v1/games/?cursor=cD0x",
    "previous": null
}
2
3
4
5
6
7
8
9
10
11
12
13
或者:
{
    "code": 200,
    "message": "success",
    "data": {
        "id": 1,
        "name": "帅高高",
        "status": 0
    }
}
2
3
4
5
6
7
8
9
# 2. 自定义JSONResponse
# 2.1 目录结构
说明:其实是一样的,我们需要新建一个 custom_json_response.py 文件,来自定义我们的 JSONResponse
...
-app06
    -migrations
        ...
    -apps.py
    -admins.py
    -models.py
    -custom_json_response.py  #新建来自定义我们的 JSONResponse
    -custom_model_view_set.py  #新建,自定义ModelViewSet
    -mypagenumberpaginations.py #编辑,分页功能的修改
    ....
...
2
3
4
5
6
7
8
9
10
11
12
# 2.2 自定义 JSONResponse
说明:在我们新建的custom_json_response.py中 自定义我们的 JSONResponse。
from django.utils import six
from rest_framework.response import Response
from rest_framework.serializers import Serializer

class JsonResponse(Response):
    """
    An HttpResponse that allows its data to be rendered into
    arbitrary media types.
    """

    def __init__(self, data=None, code=None, msg=None,
                 status=None,
                 template_name=None, headers=None,
                 exception=False, content_type=None, **kwargs):
        """
        Alters the init arguments slightly.
        For example, drop 'template_name', and instead use 'data'.
        Setting 'renderer' and 'media_type' will typically be deferred,
        For example being set automatically by the `APIView`.
        """
        super(Response, self).__init__(None, status=status)

        if isinstance(data, Serializer):
            msg = (
                'You passed a Serializer instance as data, but '
                'probably meant to pass serialized `.data` or '
                '`.error`. representation.'
            )
            raise AssertionError(msg)

        self.data = {"code": code, "message": msg, "data": data}
        self.data.update(kwargs)
        self.template_name = template_name
        self.exception = exception
        self.content_type = content_type

        if headers:
            for name, value in six.iteritems(headers):
                self[name] = value
2
3
4
5
6
7
8
9
10
11
12
13
14
15
16
17
18
19
20
21
22
23
24
25
26
27
28
29
30
31
32
33
34
35
36
37
38
39
# 2.3 APIView使用自定义响应
说明:其实很简单,APIView中很简单的,只需要把 Response 使用为JsonResponse:
from app06.custom_json_response import JsonResponse  #导入自定义响应格式

class UserDetail(APIView):

    .....

    def get(self,request, *args, **kwargs):
        user = self.get_object(kwargs.get('id'))
        ser = UserSerializer(instance=user,context={"request": request})
        return JsonResponse(ser.data, code=200, msg='ok')   #使用自定义JsonResponse格式

     ....
2
3
4
5
6
7
8
9
10
11
12
# 3. 自定义ModelViewSet
为啥我们需要自定义ModelViewSet呐。因为我们ModelViewSet 默认不是用我们的 自定义的 JsonResponse,而是采用默认的。响应格式已经高度封装了,所以这边自己写一个就是了。首先我们来看看源码带,是不是已经封装好了:
Ctrl + ModelViewSet => CreateModelMixin
来看下:
class CreateModelMixin(object):
    """
    Create a model instance.
    """
    def create(self, request, *args, **kwargs):
        ....
        return Response(serializer.data, status=status.HTTP_201_CREATED, headers=headers)  #用默认的
2
3
4
5
6
7
好咧,那我们自己封装一个,首先创建 custom_model_view_set.py 文件:
from rest_framework import status
from rest_framework import viewsets
from .custom_json_response import JsonResponse


class CustomModelViewSet(viewsets.ModelViewSet):

    def create(self, request, *args, **kwargs):
        serializer = self.get_serializer(data=request.data)
        serializer.is_valid(raise_exception=True)
        self.perform_create(serializer)
        headers = self.get_success_headers(serializer.data)
        return JsonResponse(data=serializer.data, msg="success", code=201, status=status.HTTP_201_CREATED,
                            headers=headers)

    def list(self, request, *args, **kwargs):
        queryset = self.filter_queryset(self.get_queryset())
        page = self.paginate_queryset(queryset)
        if page is not None:
            serializer = self.get_serializer(page, many=True)
            return self.get_paginated_response(serializer.data)

        serializer = self.get_serializer(queryset, many=True)
        return JsonResponse(data=serializer.data, code=200, msg="success", status=status.HTTP_200_OK)

    def retrieve(self, request, *args, **kwargs):
        instance = self.get_object()
        serializer = self.get_serializer(instance)
        return JsonResponse(data=serializer.data, code=200, msg="success", status=status.HTTP_200_OK)

    def update(self, request, *args, **kwargs):
        partial = kwargs.pop('partial', False)
        instance = self.get_object()
        serializer = self.get_serializer(instance, data=request.data, partial=partial)
        serializer.is_valid(raise_exception=True)
        self.perform_update(serializer)

        if getattr(instance, '_prefetched_objects_cache', None):
            # If 'prefetch_related' has been applied to a queryset, we need to
            # forcibly invalidate the prefetch cache on the instance.
            instance._prefetched_objects_cache = {}

        return JsonResponse(data=serializer.data, msg="success", code=200, status=status.HTTP_200_OK)

    def destroy(self, request, *args, **kwargs):
        instance = self.get_object()
        self.perform_destroy(instance)
        return JsonResponse(data=[], code=204, msg="delete resource success", status=status.HTTP_204_NO_CONTENT)
2
3
4
5
6
7
8
9
10
11
12
13
14
15
16
17
18
19
20
21
22
23
24
25
26
27
28
29
30
31
32
33
34
35
36
37
38
39
40
41
42
43
44
45
46
47
48
好啦,那这样,我就使用自己定义的ModelViewSet在视图中继承使用:
from .custom_model_view_set import CustomModelViewSet  #导入自定义的

class GameView(CustomModelViewSet):  #继承自定义的

    queryset = Game.objects.all()
    serializer_class = GameSerializer
2
3
4
5
6
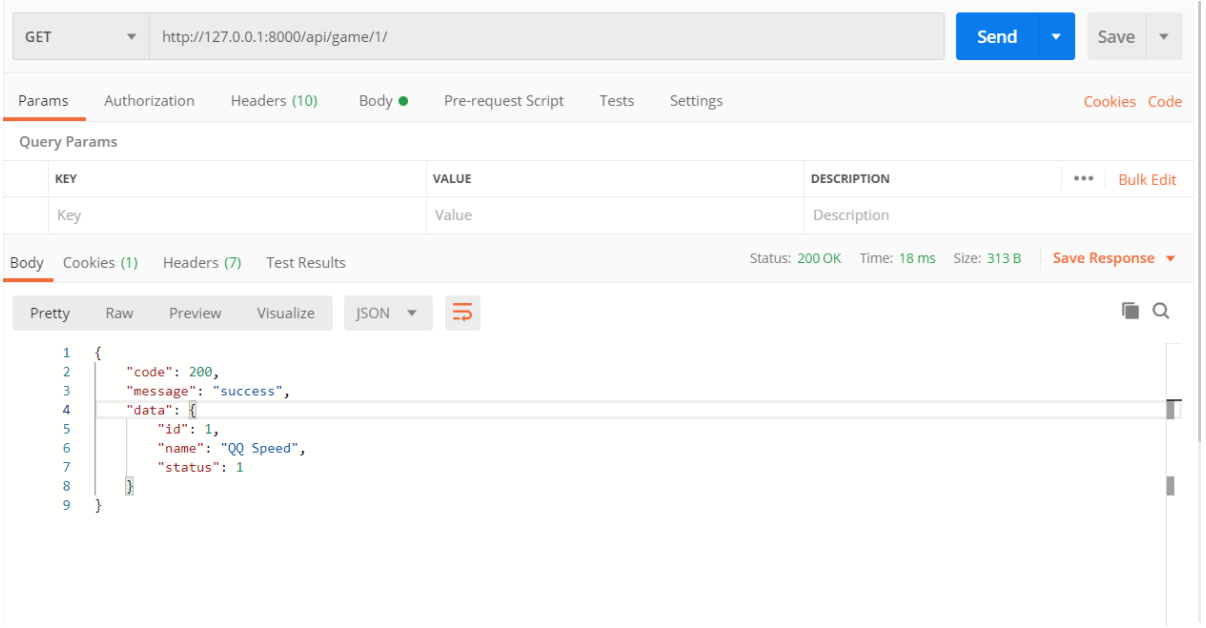
效果图如下:
# 4. 自定义分页类需要修改
我们在分页的时候,没有使用自定义的 JsonRespose,导致如下输出:
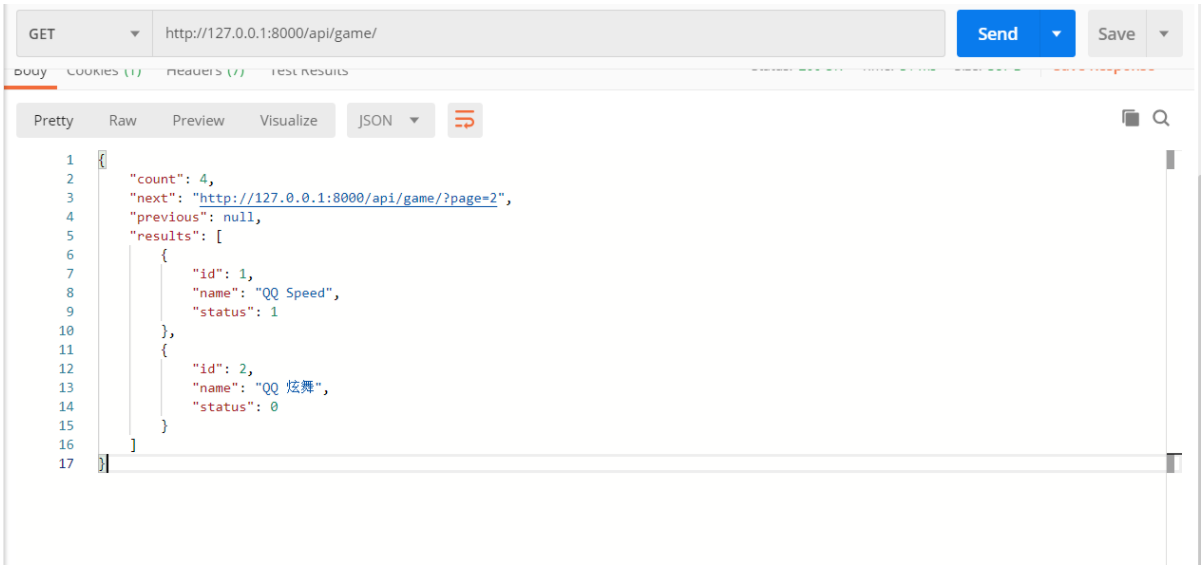
那这个不是我们想要的,所以我们需要自定义分页类需要修改,编辑 mypagenumberpaginations.py文件:
from rest_framework.pagination import PageNumberPagination, LimitOffsetPagination, CursorPagination
from .custom_json_response import JsonResponse
from rest_framework import status


#普通分页
class MyPageNumberPagination(PageNumberPagination):
    page_size = 1
    max_page_size = 1
    page_size_query_param = 'size'
    page_query_param = 'page'

    def get_paginated_response(self, data):
        return JsonResponse(data=data, code=200, msg="success", status=status.HTTP_200_OK, next=self.get_next_link(),
                            previous=self.get_previous_link(), count=self.page.paginator.count)

#切割分页
class MyPageNumberPagination(LimitOffsetPagination):
    default_limit = 1
    limit_query_param = 'limit'
    offset_query_param = 'offset'
    max_limit = 2

    def get_paginated_response(self, data):
        return JsonResponse(data=data, code=200, msg="success", status=status.HTTP_200_OK, next=self.get_next_link(),
                            previous=self.get_previous_link(), count=self.count)

#加密分页
class MyPageNumberPagination(CursorPagination):
    cursor_query_param = 'cursor'
    page_size = 1
    ordering = 'id'
    page_size_query_param = 'size'
    max_page_size = 1

    def get_paginated_response(self, data):
        return JsonResponse(data=data, code=200, msg="success", status=status.HTTP_200_OK, next=self.get_next_link(),
                            previous=self.get_previous_link())
2
3
4
5
6
7
8
9
10
11
12
13
14
15
16
17
18
19
20
21
22
23
24
25
26
27
28
29
30
31
32
33
34
35
36
37
38
注意:根据需求选择一种分页方式。我们这边选择普通分页来测试:
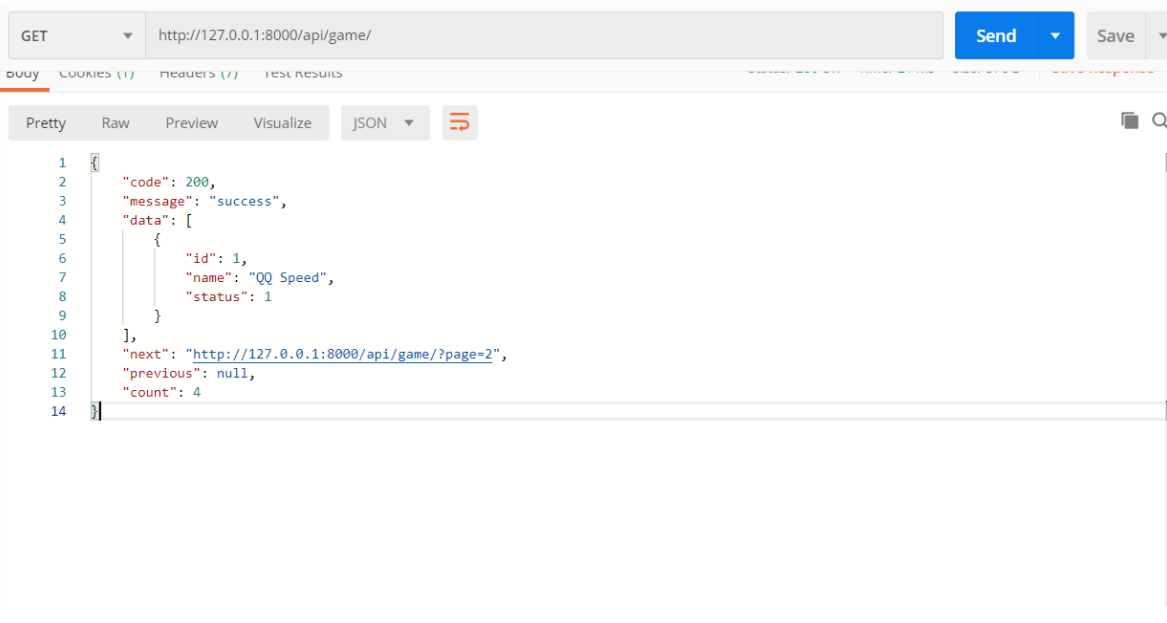
哈哈,是我们想要的啦。
# 5. 自定义Generics
其实自定义Generics跟我们的 ModelViewSet是一样的效果,这边就废话不多说了,直接上代码吧。原理跟ModelViewSet一样。
from rest_framework import status
from rest_framework import viewsets
from .custom_json_response import JsonResponse
from rest_framework import generics


class ListCreateAPIView(generics.ListCreateAPIView):

    def create(self, request, *args, **kwargs):
        serializer = self.get_serializer(data=request.data)
        serializer.is_valid(raise_exception=True)
        self.perform_create(serializer)
        headers = self.get_success_headers(serializer.data)
        return JsonResponse(data=serializer.data, msg="success", code=201, status=status.HTTP_201_CREATED,
                            headers=headers)

    def list(self, request, *args, **kwargs):
        queryset = self.filter_queryset(self.get_queryset())
        page = self.paginate_queryset(queryset)
        if page is not None:
            serializer = self.get_serializer(page, many=True)
            return self.get_paginated_response(serializer.data)

        serializer = self.get_serializer(queryset, many=True)
        return JsonResponse(data=serializer.data, code=200, msg="success", status=status.HTTP_200_OK)


class RetrieveUpdateDestroyAPIView(generics.RetrieveUpdateDestroyAPIView):

    def retrieve(self, request, *args, **kwargs):
        instance = self.get_object()
        serializer = self.get_serializer(instance)
        return JsonResponse(data=serializer.data, code=200, msg="success", status=status.HTTP_200_OK)

    def update(self, request, *args, **kwargs):
        partial = kwargs.pop('partial', False)
        instance = self.get_object()
        serializer = self.get_serializer(instance, data=request.data, partial=partial)
        serializer.is_valid(raise_exception=True)
        self.perform_update(serializer)

        if getattr(instance, '_prefetched_objects_cache', None):
            # If 'prefetch_related' has been applied to a queryset, we need to
            # forcibly invalidate the prefetch cache on the instance.
            instance._prefetched_objects_cache = {}

        return JsonResponse(data=serializer.data, msg="success", code=200, status=status.HTTP_200_OK)

    def destroy(self, request, *args, **kwargs):
        instance = self.get_object()
        self.perform_destroy(instance)
        return JsonResponse(data=[], code=204, msg="delete resource success", status=status.HTTP_204_NO_CONTENT)
2
3
4
5
6
7
8
9
10
11
12
13
14
15
16
17
18
19
20
21
22
23
24
25
26
27
28
29
30
31
32
33
34
35
36
37
38
39
40
41
42
43
44
45
46
47
48
49
50
51
52
后面就在对应的视图中导入并使用。